How To Use Git & GitHub
How To Use Git & GitHub
GitHub account creation:
To create your account, you need to go to GitHub’s website and fill out the registration form.
Git installation:
We need to install Git’s tool on our computer.
To configure username & email_id in git:
- Open Git tool & set your username (username of your Github account)
git config --global user.name "github_username"
- Next, set your email
git config --global user.email "your_email@email.com"
To check whether it has configured?
  git config --global user.name

  git config --global user.email
Now you’re ready to start using Git on your computer!
Create New Repository in Github:
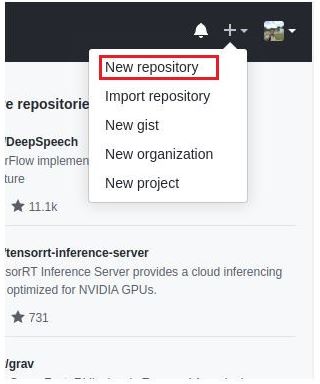
- Go to your GitHub website, look in the upper right corner, and click the + sign and then click “New repository”
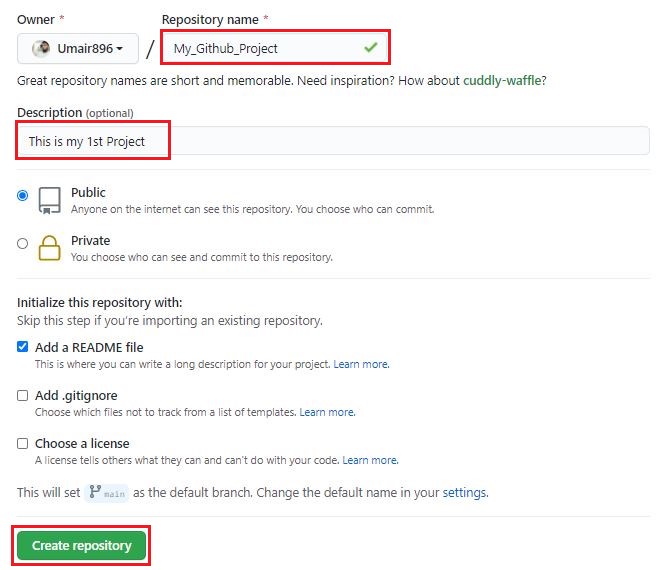
- Name the repository, and add a quick description
- Decide whether you want this to be a public or a private repository
- Click “Initialize this repository with a README” if you want to include the README file. (I definitely recommend doing this! It’s the first thing people are going to look at when they check out your repository. It’s also a great place to put information that you need to have in order to understand or run the project)
- Click “Create repository”. Your new repository will be created.


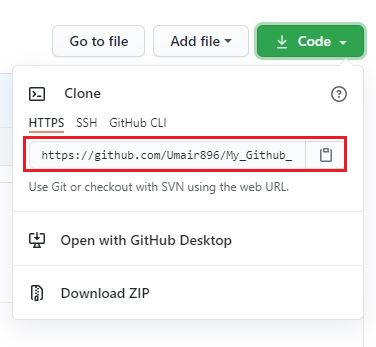
- Now you need to get a copy of the repository on your computer. To do that, you need to “clone” the repository on your computer. To clone a repository means that you’re taking a repository that’s on the server and cloning it to your computer, just like downloading it. On the repository page, you need to get the “HTTPS” address 👇

Pushing the code to Github Repo:
1) Go to your project directory using terminal (Git). Use commands as below.
mkdir my_Project //creating a folder
cd My_Project    //changing directory(going into the My_Project folder)
touch index.html style.css //creating files
When executing any Git commands, you have to make sure that you are in the correct directory in the terminal.

2) Initialize the local repository now
git init
Now you have a new hidden directory called .git in your project directory. This is where Git stores what it needs so that it can track your project.
3) After converting your directory to a Git repository, the first thing we need to do is to check the files we have by using the following command.
git status

So there are two files in that directory that we need to “add” to our Repo.
4) Add files to the staging area one by one
git add <filename_one>
or
git add <filename_one> <filename_two>
or add files at once
git add .
After the staging area (the add process) is complete, we can check whether the files are successfully added or not by executing the git status. If those particular files are in green like the below picture, you’ve done your work!

5) Then “commit” with a description in it.
git commit -m"<add a commit message here>"
6) Give the Github path URL which you have copied from Github
git remote add <remote URL>
You can check whether remote is added or not
git remote -v
7) Push our project to GitHub
git push -u origin master
8) To list the version history for the current branch.
git log
9) To list the version history for the current branch in one line.
git log --oneline
10) To git log as a graph.
git log --graph
11) To list all the local branches in the current repository.
git branch
12) To create a new branch
git branch branch name
13) To deleted a branch
git branch -d branch name
14) To switch from one branch to another
git checkout [branch name]
15) To create a new branch and also switch to it.
git checkout -b branch name
16) To merge the specified branch’s history into the current branch.
git merge branch name
17) To checkout a specific commit.
git checkout commit-id
Suppose you have made some changes / added / modified … in your project, to save changes and push to Github, follow these steps:
git add .

git commit -m"<add a second commit message here>"

git status

git push
Cloning existing repo:
- Go Github repo
- Copy repo url by clicking code button
- Open terminal
- Navigate where you want to clone
- Use command:
git clone <paste_copied_url>
- then navigate inside clone repo name
NOTE:
- To delete local repository
rm -rf .git
- If you’re working on your computer and want the most up-to-date version of a repository, you’d pull the changes down from GitHub
git pull
- Linux basic commands:
  pwd                        //knowing the directory path
  mkdir my_Project           //creating a folder
  ls                         //list the folders/files present in present directory
  cd My_Project              //changing directory(navigating into the My_Project folder)
  cd ..                      //one level up from the current directory
  cd                         //get fully back
  touch index.html           //creating files
  mv index.html project.html //rename the file
  code .                     //open the files
  rm index.html              //delete file
  rmdir my_Project           //delete folder